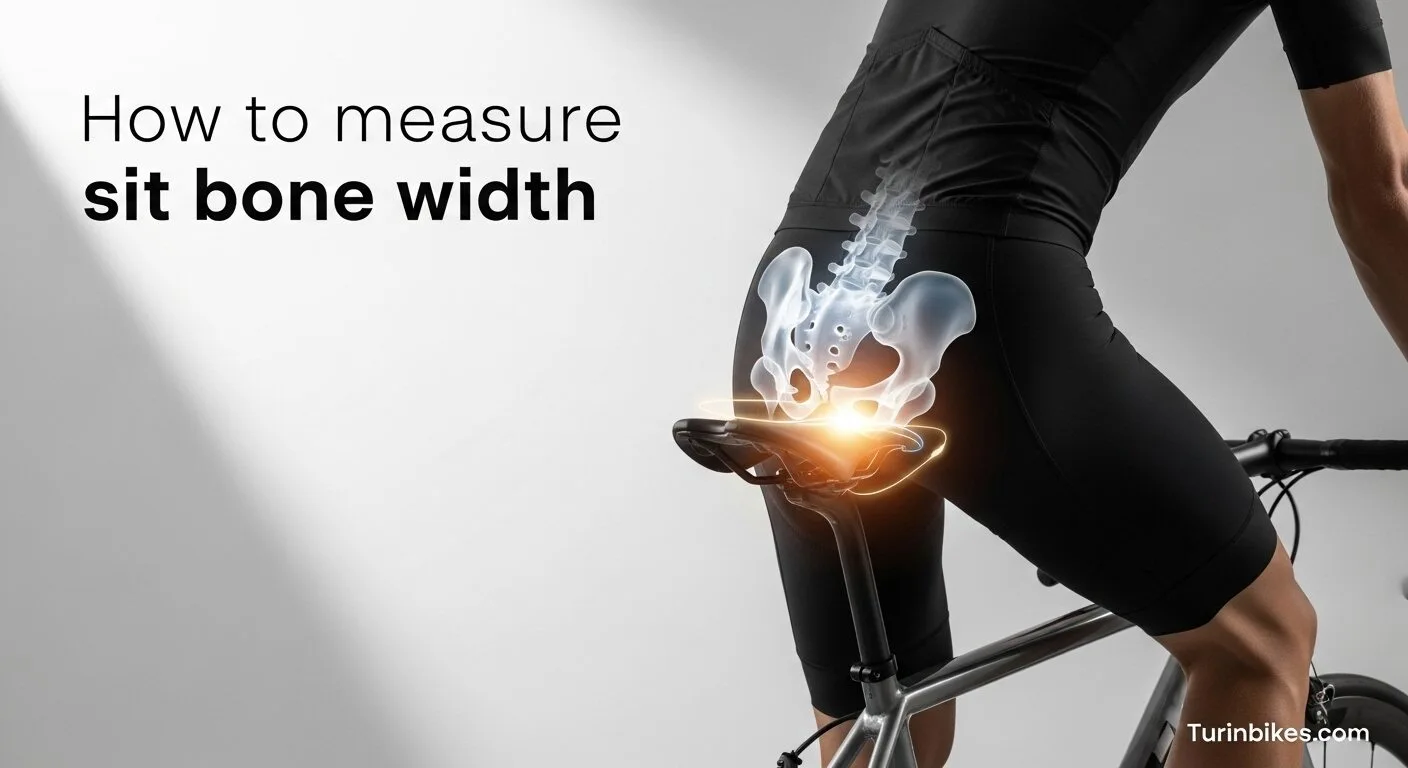
Saddle discomfort can ruin an otherwise great ride. I’ve seen riders blame padding, bib shorts, or even frame size when the real issue started with saddle width. If you want to know how to measure sit bone width, that’s the right place to start. Your sit bones carry most of your body weight on the saddle, so the saddle needs to support them correctly.
You can measure sit bone width at home with simple materials, or you can visit a bike fitter or specialist retailer for a more precise setup. Both methods work. Home measurement gives you a strong starting point, and professional fitting can help if you still struggle with pain or numbness.
Cyclists across road, gravel, mountain, commuting, touring, and indoor disciplines use sit bone measurement to narrow down saddle options. I’ll walk you through the anatomy, the cardboard method, how to convert your result into the right bike saddle width, and when it makes sense to get expert help.
What Are Sit Bones and Why Do They Matter for Cycling
What Exactly Are Sit Bones (Ischial Tuberosities)
Sit bones are the two bony points at the bottom of your pelvis. In anatomy, they’re called the ischial tuberosities. In plain English, they’re the parts of your pelvic bone that press into a chair or saddle when you sit.
You can often feel them if you sit on a hard surface and rock slightly from side to side. Those two points should rest on the supportive area of the saddle. That’s why sit bone width matters so much in saddle fitting.
How Sit Bones Support Your Weight on a Saddle
On a well-fitted saddle, your sit bones should carry most of your weight. The saddle supports those bony structures because they can handle pressure better than soft tissue.
When the saddle is too narrow, your sit bones may fall off the supportive area. That shifts pressure toward the center of the saddle, where your body has more sensitive tissue. When the saddle is too wide, you may rub your thighs or feel unstable while pedaling.
A good saddle width helps spread load across the right contact points and reduces unwanted pressure points.
The Link Between Pelvic Structure and Saddle Pressure
Your pelvic structure changes how pressure lands on the saddle. The pubic rami are the forward branches of the pelvis. In more aggressive riding positions, such as road or gravel, the pelvis rotates forward. That can shift support slightly away from the sit bones and toward the pubic rami.
If the saddle shape or width doesn’t match that posture, pressure can build in the perineum, the area between the genitals and anus. That area contains nerves, blood vessels, and soft tissue. Too much pressure there can cause numbness, pain, or tingling.
This is why a saddle that feels fine for one rider can feel terrible for another. Accurate anatomy matters here. It helps you choose a saddle based on how your body actually contacts the bike, not on guesswork.

Preparing for Accurate Home Measurement
Why Riding Posture Affects Your Measurement
Your riding posture affects how your pelvis contacts the saddle. When you sit upright, your sit bones usually contact the saddle more directly and often need more support width. When you lean forward, your pelvis rotates and contact shifts slightly forward. That changes the effective width you need.
What You Will Need
For a reliable home sit bone measurement, I use:
- Corrugated cardboard
- Firm flat surface
- Ruler or measuring tape in millimeters
- Pen or marker
Use a hard chair, bench, or step as your base. Don’t use a sofa, bed, or carpeted floor. Soft surfaces distort the indentations and make the result less accurate.
How to Measure Sit Bone Width at Home Step by Step
The Classic Cardboard Test
The cardboard sit bone test is simple and useful if you follow each step carefully.
- Place corrugated cardboard on a firm flat surface.
Put the cardboard on a hard chair, stool, wooden bench, or other flat base. Avoid a sofa, cushion, or carpet. - Sit upright and apply full body weight for a few seconds.
Sit naturally with your back fairly upright and feet slightly raised if possible. Press down with your full weight for a few seconds so your sit bones leave clear indentations. - Stand carefully without sliding off.
Rise straight up. Don’t scoot forward or twist, because that can smear the marks and ruin the test. - Locate the two deepest indentation points.
Look for the two clearest pressure dents in the cardboard. These represent the contact points from your sit bones. - Mark the center of each indentation with a pen.
Mark the middle of each dent, not the outside edge. - Measure center to center in millimeters.
Use a ruler for best accuracy. Measure from the center of one mark to the center of the other. That number is your sit bone width.
I recommend repeating the test two or three times and averaging the result if the marks vary slightly. That gives you a more dependable number.
Alternative Surfaces If Cardboard Does Not Work
Sometimes cardboard doesn’t leave a clear imprint. If that happens, try one of these:
- Slightly damp cardboard: A light mist can make indentations easier to see.
- Memory foam pad: A thin, firm memory foam pad can capture pressure points better than dry cardboard.
- Dedicated measuring pad from bike shops: Many shops use gel or foam measuring devices designed for sit bone measurement.
If you want the cleanest and fastest result, a dedicated measuring pad at a local bike shop usually works better than a DIY setup.
Troubleshooting Common Measurement Errors
A few common mistakes can throw off your result:
- Soft surface under the cardboard: This often produces a false reading because your body sinks into the base instead of pressing into the cardboard.
- Indentations not clear: Use fresh cardboard, apply more weight, or try damp cardboard.
- Measuring with a floppy tape: A rigid ruler often gives a cleaner reading than a soft measuring tape.
- Measuring edge to edge: Don’t do this. The correct method is center to center, which is the industry standard.
- Sliding during the test: Stand straight up after sitting. Any movement can smear the marks.
If your results differ by more than a few millimeters between attempts, repeat the test until you get two similar measurements.
References:
- SQLab saddle width guide — https://www.sq-lab.com/en/products/ergonomics/sqlab-contact-points/the-sqlab-active-technology/
- Ergon saddle fit resources — https://www.ergonbike.com/en/saddle-selector.html
Professional Sit Bone Measurement — When to See a Bike Fitter
Advantages of a Bike Fitter or Specialist Retailer
A professional measurement can help if you want more confidence before buying an expensive saddle. Many riders also choose this route when they have recurring numbness, saddle sores, or pain on long rides.
A local bike shop, specialist retailer, or local dealer may use a dedicated sit bone measuring device that gives a clearer pressure map than cardboard. That can save time if your home result feels uncertain.
What Happens During a Professional Bike Fitting Session
At a shop or bike fitting studio, the fitter may ask about your riding style, flexibility, current pain points, and bike setup. They often measure your sit bone distance with a gel pad, pressure pad, or branded system such as the Fit Right system used by some retailers. Then they match that measurement to your riding posture and likely saddle category.
Professional fitting becomes more worthwhile when:
- You plan to spend a lot on a premium saddle
- You ride endurance events or long distances
- You’ve already tried several saddles without success
- You have recurring numbness or tissue pressure
I don’t see professional fitting as mandatory for every rider. I see it as a smart option when comfort problems persist.
References:
- Trek Precision Fit / bike fitting overview — https://www.trekbikes.com/us/en_US/precision-fit/
- Specialized Body Geometry saddle fit resources — https://www.specialized.com/us/en/body-geometry
How to Convert Your Sit Bone Width to Saddle Width
The Sit Bone to Saddle Width Formula
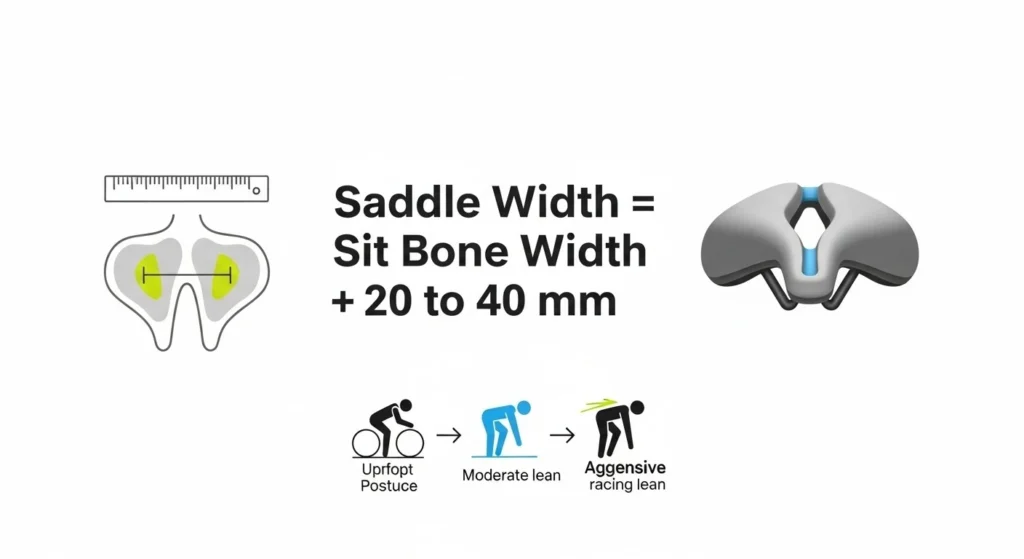
Once you have your sit bone measurement, you need to convert it into actual saddle width. A saddle should not match your sit bone width exactly. It needs to be wider so the saddle can support the bony contact points properly.
A practical starting formula is:
Saddle width = sit bone measurement + 20 mm to 40 mm
That range exists because riding posture changes how your pelvis contacts the saddle.
Always use your center-to-center sit bone measurement for this formula. That’s the standard method used in the cycling industry.
How Riding Posture Changes Your Saddle Width Requirement
This is the part many guides skip. Posture changes the amount you add because posture changes pelvic rotation.
If you ride in a more upright position, such as on a city bike, hybrid, or trekking bike, your sit bones usually carry more direct load. You often need a wider rear support platform. In that case, adding about 30 mm to 40 mm usually makes more sense.
If you ride in a more aggressive forward-leaning position, such as on a road or gravel bike, your pelvis rotates forward. That shifts support somewhat toward the front of the pelvis, including the pubic rami. In that position, a saddle that’s too wide may interfere with your pedal stroke. That’s why many aggressive riders start with about +20 mm.
This principle aligns with SQlab’s approach: ideal saddle width depends on both sit bone distance and riding posture, not on one number alone.
Narrow vs Medium vs Wide Saddles — Which Category Are You
Use this table as a starting point:
| Riding Style | Add to Measurement | Saddle Category |
|---|---|---|
| Road, gravel, aggressive MTB | +20 mm | Narrow to medium |
| Fitness, XC, moderate hybrid | +25 to +30 mm | Medium |
| City, trekking, upright hybrid | +30 to +40 mm | Medium to wide |
Here’s a simple example:
- Your sit bone width measures 115 mm
- If you ride road in a forward position, start around 135 mm
- If you ride hybrid or commuting in a neutral position, start around 140 to 145 mm
- If you ride very upright, start around 145 to 155 mm
This won’t guarantee the perfect saddle on the first try, but it gives you a fact-based starting point for how to choose saddle size.
You may still need to compare two widths if you sit between categories. Some brands also shape their saddles differently, so one 145 mm saddle may feel very different from another 145 mm saddle.
References:
- SQlab saddle width and posture guidance — https://www.sq-lab.com/en/products/ergonomics/sqlab-contact-points/the-sqlab-active-technology/
- Ergon saddle selector and fit principles — https://www.ergonbike.com/en/saddle-selector.html
Saddle Fit Is More Than Sit Bone Width
Other Factors That Affect Saddle Comfort
Sit bone width is the starting point, not the whole answer. I always look at several factors together when I think about bicycle saddle comfort:
- Shape: Flat, curved, and waved saddles support riders differently
- Padding density: Too much padding can increase pressure in soft tissue during longer rides
- Central channel or cutout: This can reduce pressure on the perineum for some riders
- Saddle flex: Some saddles flex more under load and feel smoother on rough surfaces
- Riding posture and bar height: These influence pelvic rotation and contact points
An ergonomically suitable saddle supports your body where it should and avoids excess pressure where it shouldn’t.
The Value of Saddle Testing and Trial Periods
If a brand or retailer offers saddle testing, use it. Short rides in a parking lot don’t tell you much. A saddle may feel fine for 10 minutes and awful after 90.
I recommend checking for:
- Demo programs
- Shop-based saddle tests
- Return windows
- Money-back guarantee policies where relevant
That gives you room to compare sizes and shapes without guessing blindly.
Ride Smart, Ride Comfortably
Measuring your sit bone width at home is simple, practical, and worth doing before you buy a new saddle. Use corrugated cardboard on a firm surface, mark the indentations carefully, and measure center to center in millimeters. Then add 20 mm to 40 mm based on how upright or aggressive your riding posture is.
That process gives you a much better starting point than guessing based on padding or marketing claims alone. From there, I’d compare a few saddle shapes, check any trial periods, and test before you commit.
If Turinbikes.com offers a saddle finder, product finder, saddle comparison page, or bike fitting guide, this is the right next step. If you still feel unsure, reach out to customer support or a trusted local fitter.
Measure first, choose second, and your rides will usually get better fast.
FAQs
How do I measure saddle width?
Start with your sit bone width using the cardboard test. Sit on corrugated cardboard placed on a firm flat surface, mark the center of the two deepest indentations, and measure center to center in millimeters. Then add 20 mm to 40 mm based on your riding posture. Upright riders usually add more, while aggressive riders usually add less.
What is the average sit bone width?
For most adults, average sit bone width falls roughly between 100 mm and 145 mm. Women often have a wider sit bone spread than men because of pelvic anatomy, but individual variation is significant. Height alone does not predict saddle width reliably, so I would not use average sit bone width by height as your main sizing method.
Does sit bone width match saddle size directly?
No. Your raw sit bone measurement does not equal your final saddle size. The saddle should be wider than your measured sit bone distance so it can support those bony contact points properly. Most riders need a saddle width that is 20 mm to 40 mm wider than their measured sit bone width, depending on posture.
Can I measure sit bones at a local bike shop in the UK?
Yes. Many independent bike shops, specialist retailers, and bike fit studios in the UK offer sit bone measurement. Some provide it as part of a bike fitting consultation, and some do it free when you shop for a saddle. I’d contact your nearest cycling retailer or local bike fitter first to confirm the service.
Is sit bone width the only thing that matters for saddle comfort?
No. Sit bone width gives you the correct starting point, but saddle comfort also depends on shape, padding, central channel design, saddle flex, handlebar height, and riding posture. A saddle can match your measurement and still feel wrong if the shape does not suit your body or your riding position.
References and Resources
- Cleveland Clinic — Pelvis anatomy: https://my.clevelandclinic.org/health/body/22359-pelvis
- StatPearls — Anatomy of the ischium: https://www.ncbi.nlm.nih.gov/books/NBK537379/
- SQlab — Saddle width system and posture principles: https://www.sq-lab.com/en/products/ergonomics/sqlab-contact-points/the-sqlab-active-technology/
- Ergon — Saddle selector: https://www.ergonbike.com/en/saddle-selector.html
- Trek — Precision Fit overview: https://www.trekbikes.com/us/en_US/precision-fit/
- Specialized — Body Geometry fit resources: https://www.specialized.com/us/en/body-geometry/

SEO Analyst & Bike Research Lead at TurinBikes
With over 5.5 years of experience in local & international SEO and affiliate marketing, Sachin has helped media sites and local businesses grow through data-driven strategies. He runs TurinBikes solo, creating transparent, evidence-based guides using thousands of verified user reviews, manufacturer specs, studies, and surveys – no personal ride tests, no sponsored bias. Focus: Honest recommendations for budget e-bikes and everyday riding needs. Full bio Click Here