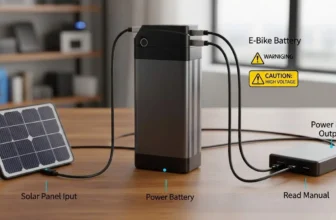
Removing an electric bike speed limiter is typically done by adjusting software settings, modifying controller wiring, or altering the speed sensor. These methods allow the motor to assist beyond the factory-set limit (commonly 25 km/h in the EU or 32 km/h in the US). However, effectiveness varies depending on the bike model, controller type, and firmware restrictions.
1. Display Settings Menu Adjustment
This is the simplest and most widely used way to increase an adult electric bike’s speed limit, as it only involves changing parameters within the bike’s display system. Because it does not require any physical modification, it’s considered a non-permanent and low-risk method, making it ideal for beginners or users who want to test higher speeds without altering hardware.
How It Works
Most electric bikes are equipped with a controller and LCD display that allow access to advanced configuration settings (often called P-settings or parameter settings). Among these parameters, there is usually a speed limit setting (commonly labeled P08, P8, or P10) that restricts how fast the motor will provide assistance. By increasing this value, you allow the motor to continue assisting at higher speeds.
Step-by-Step Instructions
1. Access Settings
Turn on your e-bike display. Then press and hold the “+” and “–” buttons simultaneously for about 2–3 seconds. On some models, you may need to press and hold the “M” (Mode) button instead.
Once successful, the screen will switch from the standard riding interface to a settings menu.
2. Navigate to P-Settings
Use the “+” or “–” buttons to scroll through the available parameters.
Look for speed-related options such as:
- P08 / P8 – Speed limit setting (most common)
- P10 – Sometimes used for speed or assist level configuration
The exact naming depends on your display type (for example, S869, M5, KT-LCD, SW900, etc.).
3. Adjust the Speed Limit
Once you’ve located the correct parameter:
- Press the “M” button (or equivalent) to enter edit mode
- Increase the value from the default limit:
- 25 km/h (15.5 mph) in many EU models
- 32 km/h (20 mph) in many US models
- 25 km/h (15.5 mph) in many EU models
You can raise it to:
- 40–50 km/h for moderate increases
- 67 km/h (a common upper preset on some displays)
- 100 (often interpreted as “no limit” or maximum controller allowance)
Keep in mind that the actual top speed will still depend on motor power, battery output, and terrain.
4. Save and Exit
After adjusting the value:
- Press and hold the “M” button (or the same combination used to enter settings) to save
- Alternatively, stop pressing buttons and allow the display to auto-save and exit after a few seconds
The new speed limit will take effect immediately on your next ride.
2. Physical Wire Modification (Controller-Based)
This method removes the speed restriction by altering the wiring connected to the e-bike’s controller. Unlike display-based adjustments, it directly affects how the controller interprets speed signals, making it a more permanent and hardware-level solution. It’s commonly used on older or mid-range e-bikes where the limiter is controlled by a simple wire loop.
How It Works
Many e-bike controllers include a dedicated speed limiter wire—usually a looped cable that tells the system to cap motor assistance at a preset speed. When this loop is connected, the limiter is active. Disconnecting it effectively removes the restriction, allowing the motor to operate at its full programmed capability.
Step-by-Step Instructions
1. Locate the Controller
The controller is the “brain” of your e-bike, typically housed in a rectangular metal or plastic box. Common locations include:
- Inside or behind the battery mount
- Under the rear rack
- Beneath the seat or frame tube
- Integrated within the downtube (on newer models)
You may need to remove a protective cover or unscrew a panel to access it.
2. Identify the Speed Limiter Wire
Once you’ve exposed the controller and its wiring harness:
- Look for a single looped wire or a pair of wires connected together via a small plug
- Common colors include white, blue, or gray, though this can vary by manufacturer
- It often appears as a standalone connector, separate from larger bundled cables
In some cases, the wire may be labeled or referenced in the controller diagram, but often it is not—so careful inspection is required.
3. Disconnect the Wire
- Gently unplug the connector joining the looped wire
- Do not cut the wire unless absolutely necessary (keeping it intact allows you to reverse the modification later)
- Once disconnected, secure both ends so they don’t interfere with other components
After this step, the speed limiter is typically disabled.
4. Reassemble and Test
- Reinstall any covers or panels you removed
- Power on the e-bike and perform a test ride in a safe area
- Gradually increase speed to confirm that the limiter has been removed
3. Speed Sensor Repositioning Trick
This method works by manipulating how the e-bike measures speed. Instead of actually removing the limiter, you “trick” the controller into thinking the bike is moving slower than it really is. As a result, the motor continues to provide assistance even when your real speed exceeds the factory limit.
How It Works
E-bikes typically calculate speed using a magnet-and-sensor system:
- A magnet is attached to a wheel spoke
- A sensor is mounted on the frame (usually near the rear dropout)
- Each time the wheel rotates, the magnet passes the sensor, generating a speed signal
When you move the magnet from the fast-spinning wheel to the slower-moving pedal crank, the system receives fewer signals per second. This makes the controller believe you’re riding slower than you actually are—so it doesn’t cut off motor assistance at the usual limit.
Step-by-Step Instructions
1. Locate the Sensor and Magnet
- Find the speed sensor, typically fixed to the rear chainstay or seatstay
- Identify the magnet, usually clipped onto a wheel spoke and aligned with the sensor
Make sure you understand their alignment before making any changes.
2. Remove and Reposition the Magnet
- Carefully detach the magnet from the spoke
- Attach it to the pedal crank arm (near the bottom bracket) using:
- The original clamp (if compatible)
- Or zip ties / adhesive if needed
- The original clamp (if compatible)
3. Adjust the Sensor Position
- Move the sensor from the rear frame to a position closer to the crank area
- Align it so the magnet passes within 2–5 mm for reliable detection
- Secure the sensor firmly to avoid movement during riding
4. Test the Setup
- Turn on the e-bike and slowly rotate the pedals
- Check if the display registers speed (even at low values)
- Take a short test ride and confirm that: Motor assistance continues beyond the usual cutoff. The system runs smoothly without error codes.
Conclusion
Removing the speed limiter on an electric bike can significantly boost performance, but the method you choose depends on your bike’s hardware and software. The display settings adjustment is the safest and easiest option, while wire modifications and sensor tricks offer more permanent results. Always weigh the legal, safety, and mechanical implications before making changes.

SEO Analyst & Bike Research Lead at TurinBikes
With over 5.5 years of experience in local & international SEO and affiliate marketing, Sachin has helped media sites and local businesses grow through data-driven strategies. He runs TurinBikes solo, creating transparent, evidence-based guides using thousands of verified user reviews, manufacturer specs, studies, and surveys – no personal ride tests, no sponsored bias. Focus: Honest recommendations for budget e-bikes and everyday riding needs. Full bio Click Here